Support
Frequently Asked Questions (FAQ)
SustainVR is a virtual reality (VR) wellness device designed to help Veterans practice evidence-based techniques that may support relief from stress, anxiety, pain, PTSD, and depression, while also promoting better sleep.
SustainVR is only available for Veterans who have completed the RelievRx program.
Yes, SustainVR comes as a separate device for you to keep.
Turn on the device by pressing the power button. The screen will guide you through a few quick steps:
1. Set your IPD (lens distance) for a clear picture.
2. Connect to WiFi.
3. Open and start a session.
You can use your SustainVR anytime you need it. However, consumer guidance from manufacturers suggest spending no more than 30 minutes at a time.
SustainVR provides an on-demand platform featuring 43 sessions grounded in cognitive behavioral therapy (CBT), designed to teach skills like deep breathing, relaxation, attention control, and mindfulness.
Yes, you can replay any session as many times as you like. You can favorite the sessions you find most helpful or calming.
No, SustainVR isn’t a structured program. However, you will be able to see recent sessions you have completed and favorite the ones you want to return to.
Your device will work without WiFi however, if you choose to connect to WiFi, you will have access to device updates and supply us with device feedback that will make the device better for future Veterans.
Support Questions
Fit your device
To put the device on, place the device over your eyes and pull straps down over your head. Make sure you have a proper fit and tighten straps if needed. Note: The device fits over most standard eye glasses with a frame width of less than 6.3 inches (160mm).
Power on the device
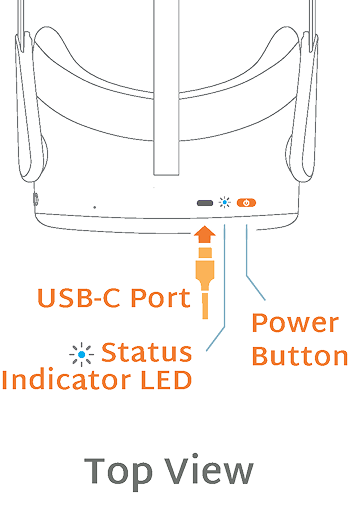
Press and hold the ![]() POWER button for 3 seconds until the status indicator turns BLUE. To power off the device, press the power button for 2 seconds until the screen goes black. You can also power off and restart the device in the
POWER button for 3 seconds until the status indicator turns BLUE. To power off the device, press the power button for 2 seconds until the screen goes black. You can also power off and restart the device in the ![]() SETTINGS Menu.
SETTINGS Menu.
Note: Your device will enter sleep mode when not in use after you take it off.
Start your device onboarding
You'll be guided through how to set your IPD, reorient your device, connect to WiFi and navigate through the content and skills in SustainVR
WiFi is not mandatory but is highly recommended so you can receive device updates and better support from our team.
NOTE: WiFi is optional but recommended. By turning on the WiFi, AppliedVR will collect the information outlined in our privacy policy, which is available here: www.appliedvr.io/privacy-policy.
Before Connecting to WiFi:
- Have your WiFi network name and WiFi password on hand.
- If possible, have a friend or family member read you the steps and your password, so you can focus on what's going on in your device.
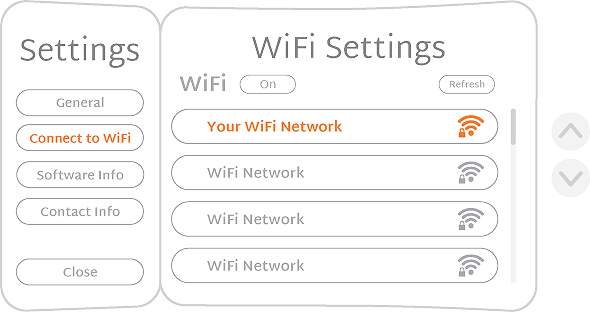
To connect to WiFi:
- Use
 GAZE to focus and activate the
  SETTINGS icon at the lower center of the Home Menu.
 - Use GAZE to focus and activate the CONNECT TO WiFi button on the left panel of the menu.
- A list of WiFi networks will appear on the right panel of the menu. If you don’t see your network, make sure to scroll down by using GAZE to focus on the arrows to the right.
Once your network is identified, use GAZE to focus on your network name to start the connection process. Once your network is identified, use GAZE to focus on your network name to start the connection process.
NOTE: If you select the wrong network, you can GAZE at the “Return” arrow to go back to the list of WiFi networks.
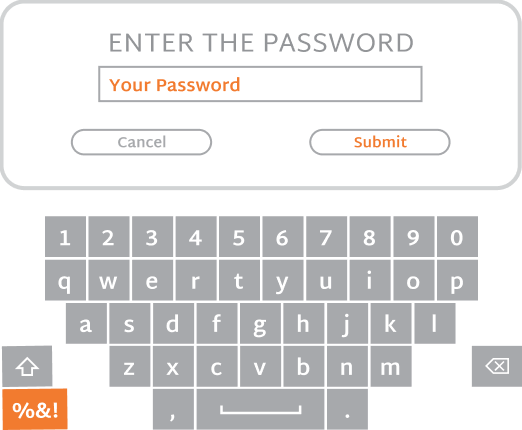
NOTE: Public networks (the types of networks that may be found at hotels or hospitals) are not supported. - Enter password and connect.
- Enter password. Enter one character at a time by gazing at each character. Hold your GAZE to confirm each character of your password.
- You will see the character added to the password bar right above the keyboard. To delete a character, simply GAZE at the back arrow. If you need a special character (%&!), select that on the lower left of the keyboard.
- Use GAZE to focus on the SUBMIT button directly below your password to start the connection process.
- Enter password. Enter one character at a time by gazing at each character. Hold your
- Connecting to WiFi
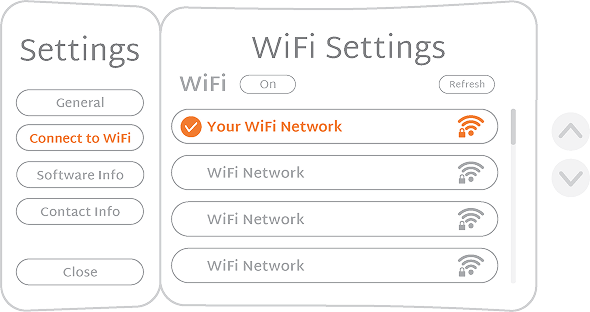
- As your WiFi connects, you can see the process on your screen along with any additional information necessary to completing WiFi setup.
- Once you have successfully connected, you will be automatically returned back to the home menu.
- If there is a need to check your WiFi connection after initial setup, you can go to CONNECT TO WIFI in the settings menu. A connected network will have a “check mark” to the left of the WiFi network name.
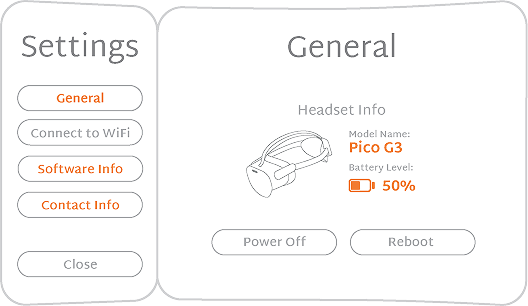
The Settings Menu can be accessed by selecting the ![]() SETTINGS icon in the bottom center of your screen. In the Settings Menu, you can check the battery level, connect to WiFi, check system information, find your device ID, and find the AppliedVR support team’s contact info.
SETTINGS icon in the bottom center of your screen. In the Settings Menu, you can check the battery level, connect to WiFi, check system information, find your device ID, and find the AppliedVR support team’s contact info.
- General: In the Settings menu, you can check your battery levels of the device. You can also power off and reboot/restart your device in General Settings.
- Software Info: Select to find out what version software your device is running.
- Contact Info: Select to find your Device ID and the support team’s contact information. Your Device ID and contact information can be helpful if you contact customer support for troubleshooting assistance.
If the view appears blurry, adjust the device up and down the face until the view comes into focus. Adjust the straps if necessary.
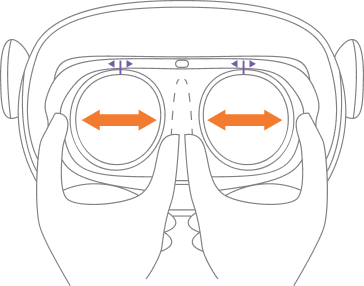
Are the device lenses properly aligned with the distance between your eyes?
The distance between the center of your eyes is called Interpupillary Distance (IPD). If the VR visuals aren't clear and visible, you might have to modify the distance between the lenses. Shift the lenses inward or outward, bring the device to your face after each adjustment, and check the image for clarity to determine the setting that produces the clearest image.
There are a number of ways to reorient:
- In the Home Menu, Select the
 COMPASS icon on the lower center of the screen.
 - When in a session, select the
 ANCHOR icon at the lower center of the screen. The In-App Menu will appear. Select the COMPASS icon on the lower right of the In-App Menu.
 - You can press the
 HOME button on the device to reorient. (The HOME button is the bottom button on the exterior right side of the device)
Causes of Fogging
Fog appears when warmth, such as the face’s warm temperature, comes into contact with a colder item such as the VR device’s lenses.
Ways to Prevent Fogging
Storage
Store your device in a warmer environment in order to keep it closer to body temperature, but not in an environment that is in extremely hot conditions to avoid damage. Reminder, direct sunlight will damage the device.
Environmental conditions for transport and storage:
- An ambient temperature range of -20˚C to 45 ˚C / -4˚F to 113˚F
- A relative humidity range of 15% to 85% (including condensation)
- An atmospheric pressure range of 70.0 kPa to 106.0 kPa
After removal from the protective case and between uses, store device at room temperature, 20˚C / 60˚F.
Please use the following environmental conditions for operation:
- An ambient temperature range of 5˚C to 40 ˚C / 41˚F to 104˚F
- A relative humidity range of 15% to 90% (non-condensing)
- An atmospheric pressure range of 70.0 kPa to 106.0 kPa
Maximum Altitude Use: 2000m / 6561 ft
Warm up your VR Device before use
If you are not able to store your device in a warmer environment, putting it on for 3-5 minutes may allow for the device to acclimate to the temperature of your body.
Anti-Fog Spray
Aerosol fog spray can be used on the lenses with a small amount directly on the device lenses, however, please refrain from use of any solution that is alcohol-based as it could damage the lenses.
Avoid Damaging the Screen
CAUTION: To avoid damaging the screen: DO NOT expose the device to direct sunlight. Extra care should be taken when the device is placed outdoors, on a balcony, windowsill or in the car. Exposure to direct sunlight for less than 1 minute may cause permanent yellow spots on the screen and damage the optics and display. The device will not be usable if damaged.
There are no user-serviceable parts inside.
Lens Care
Protect the optical lenses during use and storage to prevent sharp objects from scratching the lenses.
Using a dry nonabrasive lens wipe, wipe the lens from the center to the outer edge.
- DO NOT clean the lenses with any harsh cleaning products such as bleach.
- DO NOT use abrasive cleaning solutions that may lead to damage to the lenses.

Care & Cleaning Recommendations
1. Device: We recommend cleaning the device routinely. Wipe all non-porous surfaces, including the top straps, the back head-pad, face cushion and the headset enclosure with a hydrogen peroxide-based disinfectant wipe (AHP®)1.
Allow surfaces to remain wet for the duration specified on the packaging of the wipes. Let the surface dry completely before use.
2. Face Cushion and Care:
- Wipe the non-porous parts of the face cushion with a hydrogen peroxide-based disinfectant wipe, and allow it to remain wet for the duration specified on the packaging of the wipes.
- DO NOT use the hydrogen peroxide-based disinfectant or other chemical wipes on the lens.
- Store the device in the protective case.
Make sure the device is completely plugged in while charging. If the battery is completely drained, allow two hours to fully charge.
Battery Levels
You can check the battery level of your device in the INPUT SETTINGS screen within the main menu. It can be accessed by selecting the ![]() SETTINGS icon in the bottom center of your screen.
SETTINGS icon in the bottom center of your screen.
Charging the Device
The device battery will last approximately 2.5 hours when playing content. Use the adapter and cable provided in your kit to charge the device. The charging port is located on the top of the device.
Please plug the USB-C cable into the device, connect the other end of the cable into the power adapter, and plug your power adapter into a power outlet. The Status Indicator LED flashes a RED light when the battery is low.
NOTE: The device only charges when you are not wearing it. Ensure that the proximity sensor in the device is not covered, otherwise the device will not charge
Status Indicator LED Lights
Battery Levels

NOTE: The battery is not user replaceable or serviceable. If you have lost the charger please contact patient services. Do not attempt to open your device to access the battery.
If you are currently a SustainVR user and need assistance, please don't hesitate to call or email us
We are available Monday - Friday (9:00am - 7:00pm ET)
Call: 844-728-4487
Email: support@avrpathway.com